Tuesday, April 27, 2010

1st Birthday: Red Barn Cake

Another fun week of cakes, I couldn't decide which one to post.  I finally decided on this red barn for a little boys 1st birthday.   I should mention that the inspiration from this cake was from many different cakes I googled on the internet.  The cake was vanilla butter cake with vanilla swiss meringue buttercream.
All decorations are handmade out of sugarpaste.  Which one is your favorite?  I think my favorite is the goat, but I do love the weathervane that sits on top of the barn.

Tuesday, April 20, 2010

Cakes for Boys... of all ages!

Lately, I've been posting lots of cute baby shower and birthday cakes.  Today I decdied to post some cakes that are a little bit more masculine.  This selection of cakes were for little boys....  and big boys too.

This wolverine cake was all edible except for the toothpicks holding the sugarpaste blades in place.  The cake was half chocolate sour cream cake, half lemon and the fist was carved chocolate cake.
This WWE cake was chocolate sour cream with vanilla swiss meringue buttercream.  The figures, Jeff Hardy and the Undertaker were handmade with sugarpaste.  The rope around the ring was also edible - it was shoelace licorice that I purchased (which was very hard to work with....)
And of course, a Star Wars cake and cupcakes - a very popular request also.  The yoda cake I made last year continues to be a popular blog post.
Hope you enjoyed these cakes!  Have a wonderful week! 

Friday, April 16, 2010

Twins 1st Birthday Cake

I love receiving photos from my clients enjoying their custom cake.  A few weeks back, I made this 1st birthday cake for twin girls.  The characters on the cake were handmade sugar replicas of their favorite stuffed animal toys.
Here are the cute girls, Lauren and Emily, with their cake.  Before....
...and after!  How cute is that?

Tuesday, April 13, 2010

2-tier Topsy Turvy Cake

I love how custom designed cakes can be such a thoughtful and personalized gift.  This 2-tier topsy turvy cake was for a pre-wedding dinner party.  The couple throwing the party was not able to attend the upcoming wedding and wanted to surprise the brides-to-be with this cake.

The colors of the cake were based off their wedding dresses - pale sage green and ivory.  I also added in "Bunny" who travels with them extensively.  Bunny was part of their engagement in Paris and the client asked if I could somehow showcase this on the cake.

The top tier was zesty lemon cake with lemon buttercream.  The bottom tier was vanilla butter cake with vanilla swiss meringue buttercream.
The final touches: a handpainted Eiffel tower on sugarpaste sheet and a cake stand.  Et voila!  Wishing the brides a wonderful wedding and happy travels together.... and Bunny too! 

Tuesday, April 6, 2010

Purse Cake Tutorial

In September, I posted a cake carving tutorial which continues to be a very popular blog post.  So, here is another step-by-step cake carving tutorial of a very popular cake design - a Louis Vuitton Purse.

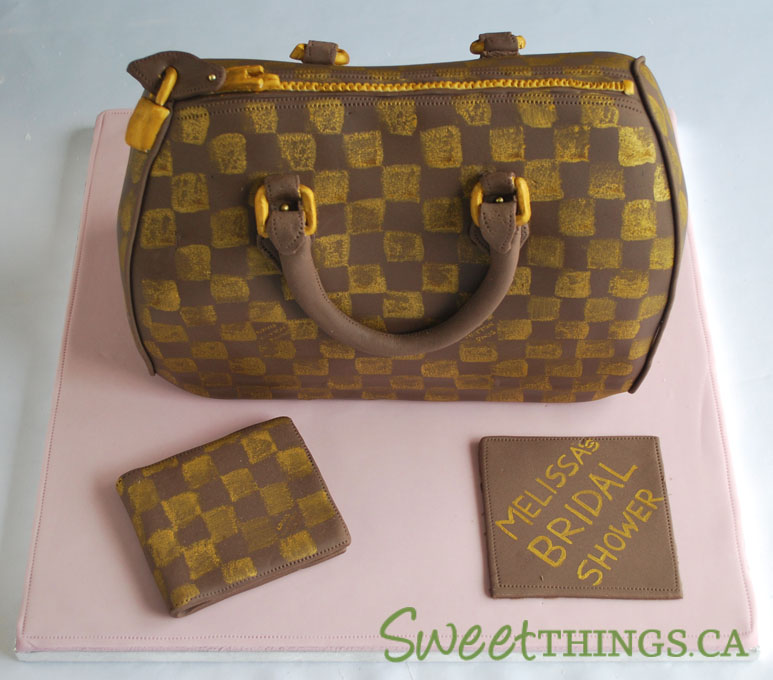
This cake was for a bridal shower and was a replica of the bride-to-be's checkerboard LV purse with a matching wallet.
Step 1:  Prepare the cake for carving:  The cake was strawberry vanilla and chocolate sour cream cake with vanilla swiss meringue buttercream.  I usually put the wrapped cake in the freezer prior to carving so that it is as solid as possible.  The cake is on a small fitted cakeboard and then on a turntable - ready for carving!
Step 2:  Carve Carefully:  I always post photos on my wall of the purse images in all different angles.  Make sure you have a sharp knife (I use a large bread knife and a smaller one for finer details) and I cover my work surface with the plastic wrap that my cakes were covered in.  Very easy clean up and you should always keep your work area and sinks as clean as possible. 
For this design, I started with the front angle of the cake, then moved to the side angle. I carved only small pieces off and then stood back regularly to look at the cake from every angle.  For this purse, I also added in some extra indentations as purses are never perfectly pouffy (is that a word?)
Step 3:  Cover the cake:  Clear away the cake shavings and clean your work surface.  I iced the cake with vanilla swiss meringue buttercream which I find the best and sturdiest for my carved (sculpted) cakes.
I added some additional white fondant to my chocolate fondant to get the proper LV brown.  
Once the fondant is fitted perfectly around the cake, I cut off the excess fondant with my scraper.  Some people use a pizza cutter, but I prefer the scraper.
Step 4:  Decorate! For this LV design, I had to find the perfect shade of gold.  I had to use a mixture of 3 lustre dusts, edible gold paint and some lemon extract.  This designed required perfect squares to be painted on the uneven surface.  I found some make-up sponges that I cut into a square and then I used it as a stamp.  Note: For the LV Logo purses, you have to freehand paint every logo.  I don't know of a stencil or any easier way to do it.
Once it was painted, then I moved the cake to the sturdy cakeboard.  It was covered in a pastel pink which I think makes the brown stand out more.  Then I added the rest of the decorations and it all came together. 

Sunday, April 4, 2010

Easter Cupcakes

I hope everyone is enjoying their long weekend.  Here are some yummy and cute Easter cupcakes... Strawberry Vanilla with strawberry buttercream and Vanilla bean cupcakes with vanilla swiss meringue buttercream topped with handmade sugarpaste bunnies.
For the dog lover, we have strawberry and chocolate cupcakes topped with handmade bunnies and dogs with bunny ears.
And some chocolate sour cream cupcakes and orange dream cupcakes, both topped with chocolate buttercream.  Hope you enjoyed these cupcakes!