
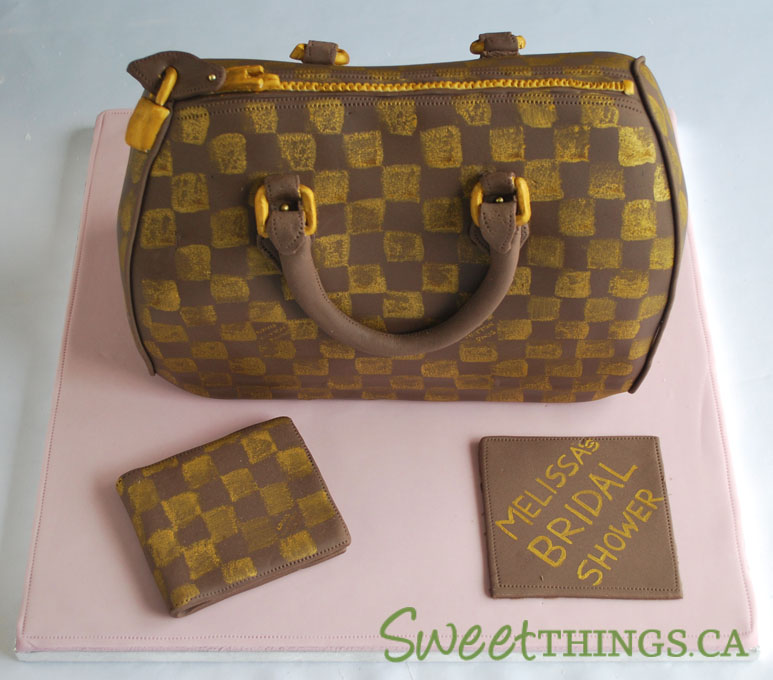
This cake was for a bridal shower and was a replica of the bride-to-be's checkerboard LV purse with a matching wallet.


Step 2: Carve Carefully: I always post photos on my wall of the purse images in all different angles. Make sure you have a sharp knife (I use a large bread knife and a smaller one for finer details) and I cover my work surface with the plastic wrap that my cakes were covered in. Very easy clean up and you should always keep your work area and sinks as clean as possible.

For this design, I started with the front angle of the cake, then moved to the side angle. I carved only small pieces off and then stood back regularly to look at the cake from every angle. For this purse, I also added in some extra indentations as purses are never perfectly pouffy (is that a word?)


I added some additional white fondant to my chocolate fondant to get the proper LV brown.

Once the fondant is fitted perfectly around the cake, I cut off the excess fondant with my scraper. Some people use a pizza cutter, but I prefer the scraper.


Once it was painted, then I moved the cake to the sturdy cakeboard. It was covered in a pastel pink which I think makes the brown stand out more. Then I added the rest of the decorations and it all came together.


36 comments:
Truly amazing! I am in awe. Thanks for sharing!
Thanks you! great tutorial...
A kiss from Spain
Let me just say you are my new hero!! I have to make one of these in a few weeks and I honestly didn't know where to really begin. Thank you for posting!!
Great tutorial! Love the cake too!
Thanks for posting! The cake looks fabulous!
WOW! You are a true inspiration to cake decorating. Amazing job! Thanks for the tutorial :D
So beautiful! You've inspired me, maybe I should try some more 3D cakes!
seriously amazing!
wow, thanks for showing us this great pics!
♥
Perfectly written article..
I seriously think you are AMAZING!!! How cute! I bet the guests even took pictures of it! No one will EVER forget it! So cute!!!!
Thanks so much for stopping by ladies!
Destini - Can't wait to see your purse cake - I bet it will be great!
LOL at me! I zoned in on the cake before reading title. You totallly had me fooled. It really IS a purse cake!
That is really impressive work. My sister in law does these for her friends. It must taste amazing. Keep up the great work with your baking tips and please stop by my health blog sometime. The web address is http://healthy-nutrition-facts.blogspot.com/.
such awesome tutorial! thanks for sharing! its' a beautiful LV bag!
Nice Tutorial! Purse cakes are still very popular these days, and making those darn logo one by one if a pain in the buttucks! It takes a very patient person, and I am not one to harvest this trait all of the time, LOL!
I love your work!
Totally adore your work! You have gifted hands... Do you have your own bake shop or store?
The Cakerator - You are right, it takes a very patient person and a very steady hand. Hard to paint when you can't rest your hand on anything. Or if you do - you are indenting the cake or cakeboard by accident.
Coffee Machine - Thank you for visiting. I have a small cake studio, but it is not a retail outlet.
AMAZING!!!
gorgeous cake... it really does look like a purse!
thanks you for the tutorial!! wonderful!
you are an utter genius- an artist. love your work- in awe of you.x shayma
thanks.. thats awesome, thankyou so much for the tutorial.
thanks for the tutorial! planning to make this cake this weekend. by the way what pan size did you use? it looks like the size of the real one!
@nina Sorry, I don't remember what the cake pan size was. Usually I just go to the LV website as they give out the exact purse dimensions. Then I can figure out how big of a pan I need which then tells me how many approx. servings.
Truly it's lovly, thank u .hope to bake one this weekend.blessing
You are really genius..Awesome and so perfect looking cake:) Wish to taste it:)You should continue your this skill and update more post.
Wow...this looks so amazing. I am definitely going to try it
amazing!!! wow! thank you for the tutorial, love it!!! :)))
Biautiful!!!
you bake two cakes in what pan sizes?
@wilma I'm not sure. It looks like 10" cakes. For high end purses, their dimensions are usually posted on the designer's website, so I try to make it the same size.
Thanks for sharing, You are just too good and have inspired me.
Please how did you move it to the board, with what?
@Evelyn Michael I just used a bigger off set spatula, scooped it under the cake (also supporting it with my other hand) and plopping it on the cake board. I actually trace the outline of the purse cake on the board and cut out the fondant. Then the purse stays in there more sturdy. Hope that helps!
Post a Comment