Showing posts with label tutorial. Show all posts

Tuesday, June 11, 2013

Craftsy Review and Contest Giveaway!

Have you heard of Craftsy?  Some of you might be like me, as you may have signed up but haven't had a chance to take a course.  They have created this wonderful system where you can easily take online classes for cake decorating, sewing and so much more.

I am not trying to sell you anything - I'm actually going to tell you about 2 of their FREE cake decorating classes.  They are not paying me or giving me anything to do this review - they will actually give one of you a free Craftsy cake decorating class - so make sure you enter to win.

If you are a cake decorator, seamstress or crafter - you probably have lots of quiet time working some late hours.  Usually when I'm decorating or creating sugarpaste decorations, I have my iPad playing in the background with food network or some mindless reality show.

It only took me a few minutes to figure out the Craftsy system and the neat features. I realized that I could watch a course while I was in cake-mode and easily re-watch later.  I watched these 2 free classes.

1) Modern Buttercream with Joshua John Russell
  • Firstly, this class is free and jam-packed with a ton of information.  If you've seen Joshua on Food Network - he's pretty awesome and generously shares how he does things.  Whether you are a beginner or professional, there is a cool tip to try or just interesting to know how another caker does it.
  • I'm not sure the full length of the videos as it was in several parts, but it must've been a couple hours total.  I kept thinking that it would stop and you'd have to pay more to see how the cake turns out.  You really got to see the cake from start to finish - tons of tips along the way.
  • Joshua is quite a perfectionist like many cakers.  I really like how he said it was "simple".  But in actual fact, he is really passionate about making his cakes perfect and he provided "simple in the highest quality".  It allows the viewer to decide what degree they want to follow the techniques.  It also allows people to appreciate what goes into making a cake.
  • I would highly recommend this class and if all the other classes provide as many tips, viewpoints and ideas - that is awesome!

2) The Hand Painted Cake with Erin Schaefgen
  • Another free class that I watched during my late nights making sugarpaste decorations.  Erin shares some great color tips like "How do you make grey?" and I just had that problem the other week.  She also gave the best explanation about the use of a little pencil to outline designs on a cake.
  • She also re-affirmed my thoughts when I do free-hand painting on cakes.  A lot of this video was her painting in different techniques, which I probably couldn't sit there and watch.  But, it was actually nice to to have this in the background, glance up once in a while and listen to her talk.  I actually didn't feel so lonely in the wee hours caking :-)

I would definitely recommend that you at least watch the free classes.  Make sure you enter to win a free Craftsy cake decorating class:
  1. Jump over to Craftsy to enter your name.  One entry per person.
  2. Deadline for entry is Monday, June 17th, 2013 at 8pm EST.
  3. One winner will be randomly selected and notified in a week. 
Lastly, if you want additional free tips, you have to check out their blog and youtube channel.  A ton of helpful info for everyone!

Friday, November 2, 2012

Coolest Homemade Cake

I love making cakes shaped like other food items, like this giant hot dog cake.  I had this great opportunity to be featured on the Ontario Premier's Blog and make a video.  I came up with this cool homemade cake idea to share with everyone.
Everyone cake make this fun and fabulous cake that looks like a Peanut Butter and Jelly Sandwich.  It doesn't require any fondant covering skills and its fast, easy and look fabulous!  It's great for birthdays, an anniversary or any type of event.  And for those who are allergic, it doesn't contain any peanuts!

Here's what you'll need:
  • Two 8-inch square vanilla cakes
  • Vanilla buttercream, Chocolate Buttercream, Chocolate buttercream (with some yellow food coloring) to look like peanut butter.
  • Strawberry jam
  • Make your own template of the "bread" out of parchment paper and cake board of the same shape
  • Large and small palette knife
  • Bread knife and smaller knife for carving
  • Larger cake board or plate
  • turntable (optional)
 Hope you enjoyed the video!  I had so much fun making it!

Friday, July 13, 2012

1st Birthday: Bear Cake Photo Tutorial

Happy Friday everyone!  As promised from my Tuesday blog post, this is the follow-up of the Classic Pooh Bear cake.  I remembered to take some photos along the way with my iPhone.
Step 1:  The Cake:  The cake was 4 layers of 6" round chocolate sour cream and vanilla bean cake.  I placed these on a cardboard cakeboard in the shape of the bottom and legs, so I can transfer it onto the bottom fondant covered cake tier.
Step 2:  Carve while looking at your inspiration.   Usually I have photos on the wall showing all angles of my inspiration, but this one was a little easier with the bear.
Step 3:  Use leftover large cake pieces to fill in the head.  I actually had 2 nice pieces from the mid-body that I was able to use.
Step 4:  Ice with thin layer of buttercream.  I used a thin coat of chocolate swiss meringue buttercream and put in the fridge for about an hour.  Not the exact shade of bear, but tasty!

Step 5: Add thicker coat of buttercream.  Then I added in a thicker layer all around and just used the palette knife to make it look like fur.  I also made sugarpaste ears which I then iced with buttercream.  I used a a lighter shade of buttercream (less cocoa) for the feet and ears.  The eyes, nose, paws and ear details were made out of fondant.

Once it was done, I transferred it onto fondant covered bottom tier

Friday, June 29, 2012

DIY Cupcake Wrapper Bunting Tutorial

My daughter's 1st birthday is just around the corner and I'm so excited.  A few days ago I posted this photo on Instagram.  I found this lovely garland idea from my blog friend Coco Cake Cupcakes and she saw the inspiration from a blog called Petunia.  I thought I'd put together my first DIY tutorial with this Cupcake Wrapper Bunting (or garland if you prefer).
This project is perfect for those dud cupcake wrappers.  You know the ones... the expensive, bright and pretty designs that end up fading when you bake cupcakes.  I was lucky to find these colorful wrappers at the Dollar Store which were in packages of 60.  I was suspicious of the good deal even though I bought them for this project... and true enough, they faded when I baked cupcakes.

Estimated Total Project Time:  1.5 hours
What you will need: 
  • Your color inspiration:  Mine is this Winnie the Pooh picture which is the theme of the dessert table
  • Kitchen string/twine, scissors and measuring tape
  • Large needle
  • Cupcake Wrappers:  Approx. 40 per feet of garland you want to make.  I made 12 feet which was a total of 480 wrappers.
Step 1:  Get your Cupcake Wrappers ready.  Cut the length (plus a little extra) of the garland you need.  Tie a knot in one end and thread the needle on the other side.
Step 2: Make your first foot of the garland.  Start randomly sewing through the center of the cupcake wrappers.  Put them forward, backward, large, small and open some of them up all while trying to match your color inspiration.  Once you have done about 40 wrappers, you have a foot.
Step 3:  Tie a knot after each foot.  This will help so that they don't separate in weird spaces when you hang them up and so that you can always add to the garland if you want to make it longer.
Step 4:  Keep sewing until you are done.  It does get easier after the first foot.  Similar to dealing out cards, sort your cupcake wrappers.  I found it easy to keep them in piles of 20 and keeping in mind the color inspiration.   Then I sewed 2 piles together and tied a knot after each foot.
I made 12 feet which ended up being 480 cupcake wrappers.  Since I purchased the cupcake wrappers at the dollar store, this project cost less than $10.  I hope you enjoyed this DIY - have a great weekend!

Tuesday, December 20, 2011

Christmas Cupcake Tutorial

Christmas is just around the corner. I put together a simple and easy tutorial for Christmas tree cupcake toppers.
What you need:  A small rolling pin, green and yellow fondant, star cutter, painbrush and small pair of nail cutting scissors.  The nail scissor can be found at any of those dollar stores and very useful for your cake tool box.
Step 1:  Roll the green fondant into a pointy shape.  If your fondant is very soft, mix with gumpaste or add some tylose to it to stiffin it up.
Step 2: With the curve of the scissors pointing upward, start making little cuts into the fondant.  Match the start and finish of the cuts and just move around the shape.
Step 3: When you've reached how tall you want the tree, then make the final cuts very deep.  Then you can just easily twist off your tree.
Step 4: Roll out the yellow fondant and cutout your star.  Dab a little water on top of the tree and place it on.  And there you have a simple Christmas tree - feel free to add additional decorations too!
I liked my trees plain as I did made a little reindeer to match my daughter's onesie that says "My First Christmas".  Hope you enjoyed the tutorial and have a great week! 

Saturday, October 30, 2010

Halloween Cupcake Tower

Happy Halloween Everyone!  I wanted to share this fun cupcake tower with a Mummy cake topper and halloween cupcakes.

If you'd like to see how I made these cupcake toppers and cake, click on over to visit Kathia at Pink Little Cake for a how-to and mini-tutorial.  Aside from being a fabulous cake designer, Kathia has a great blog that I follow.  Over the past month, she has been putting together a collection of fabulous blog posts called 28 Days of Sweet Halloween Ideas.  Lots of great ideas and I am happy to participate with my fellow bloggers.

Wishing everyone a safe and happy halloween weekend.

Tuesday, May 18, 2010

3rd Birthday: Sphinx Cake

A very popular blog post of mine was the King Tut cake.  I was so happy to get another order with an Egyptian theme and also requesting the carved hieroglyphics on the cake board.

This cake was for a 3rd birthday for a girl who loves all things Egypt, especially the Sphinx.
This is where it began with the cake board which is covered with fondant and handcarved with hieroglyphics.  Well, not real hieroglyphics, I made this up.  Then dusted with tan and grey edible dust to look ancient.

This is where it all began.... Soon this would become the Sphinx.

Here's what the cake looked like all carved up and ready to be iced with buttercream.

The cake is covered in fondant and where I started to get some of the textures on the sides of the cake.

The final details were to paint the headdress of the Sphinx, similar to a toy that the little girl had, and a bit more hieroglyphics.  What a fun cake - hope you enjoyed the photos!

Tuesday, April 6, 2010

Purse Cake Tutorial

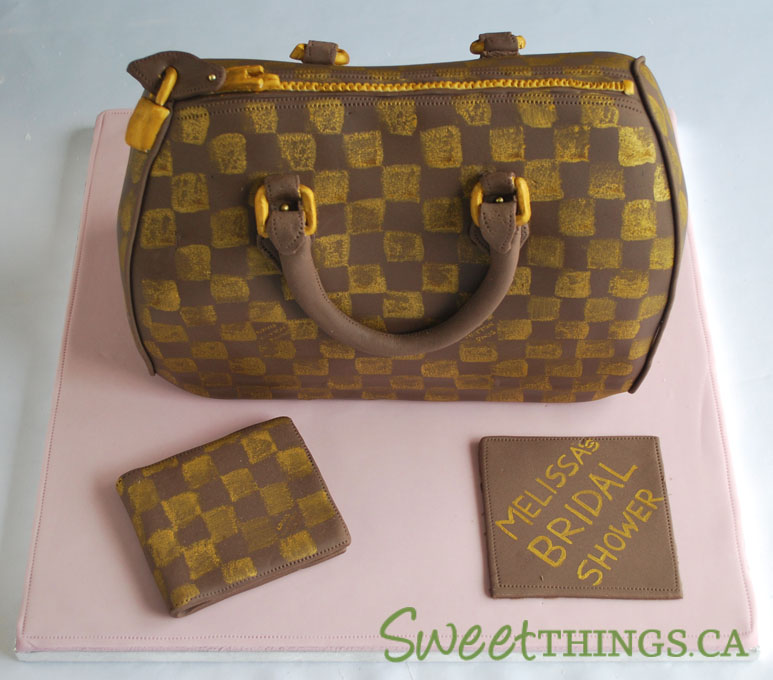
In September, I posted a cake carving tutorial which continues to be a very popular blog post.  So, here is another step-by-step cake carving tutorial of a very popular cake design - a Louis Vuitton Purse.

This cake was for a bridal shower and was a replica of the bride-to-be's checkerboard LV purse with a matching wallet.
Step 1:  Prepare the cake for carving:  The cake was strawberry vanilla and chocolate sour cream cake with vanilla swiss meringue buttercream.  I usually put the wrapped cake in the freezer prior to carving so that it is as solid as possible.  The cake is on a small fitted cakeboard and then on a turntable - ready for carving!
Step 2:  Carve Carefully:  I always post photos on my wall of the purse images in all different angles.  Make sure you have a sharp knife (I use a large bread knife and a smaller one for finer details) and I cover my work surface with the plastic wrap that my cakes were covered in.  Very easy clean up and you should always keep your work area and sinks as clean as possible. 
For this design, I started with the front angle of the cake, then moved to the side angle. I carved only small pieces off and then stood back regularly to look at the cake from every angle.  For this purse, I also added in some extra indentations as purses are never perfectly pouffy (is that a word?)
Step 3:  Cover the cake:  Clear away the cake shavings and clean your work surface.  I iced the cake with vanilla swiss meringue buttercream which I find the best and sturdiest for my carved (sculpted) cakes.
I added some additional white fondant to my chocolate fondant to get the proper LV brown.  
Once the fondant is fitted perfectly around the cake, I cut off the excess fondant with my scraper.  Some people use a pizza cutter, but I prefer the scraper.
Step 4:  Decorate! For this LV design, I had to find the perfect shade of gold.  I had to use a mixture of 3 lustre dusts, edible gold paint and some lemon extract.  This designed required perfect squares to be painted on the uneven surface.  I found some make-up sponges that I cut into a square and then I used it as a stamp.  Note: For the LV Logo purses, you have to freehand paint every logo.  I don't know of a stencil or any easier way to do it.
Once it was painted, then I moved the cake to the sturdy cakeboard.  It was covered in a pastel pink which I think makes the brown stand out more.  Then I added the rest of the decorations and it all came together. 

Tuesday, September 1, 2009

Step-by-Step Cake Carving Tutorial

I've been asked by many people to post a step-by-step tutorial on how I carve a cake. So, today's post will be step-by-step pictures on a very interesting cake order.

The order requested was for "One Male Brown Butt". It seems that this was a joke gift for an office going away party.... I really don't mean to offend, this is for fun - so please don't scroll down further if you don't want to read anymore.

Step 1: The cake was Chocolate Velvet Cake with Vanilla Swiss Meringue Buttecream. Depending on the type of cake, I usually put the wrapped cake in the freezer prior to carving so that it is as solid as possible to carve.

Next, you need to get a clear picture in your head of the cake, if the images have not been provided by the client. I dared to google "Male Bum".... I didn't open any of the images, but the thumbnails were quite sufficient :-)Step 2: Make sure you have a very good cake cutting knife. I have a larger one and a smaller one to carve the finer details.

I started with a major part of the design, the crack, and started to cut. Then I just began carving - you have to just go for it. You can't stare or think too long. Carve small pieces and stand back regularly to look at the cake from different angles - there is no "undo".
For my cakes, I try to add in all the fine details in the carving, instead of leaving it to buttercream or fondant. Here are the dimples in the butt.Step 3: Cover the carved cake in Buttercream. I usually put this in the fridge until the buttcream cream hardens a little bit. Then I take it out from the fridge and smooth out the buttercream as much as possible. For this design, I had to smooth out using my hands - picture that! :-)Step 4: I dyed my fondant to the proper shade of brown - make sure you ask specifics from your client to ensure you meet their expectations. They will usually provide a photo or color palette. I rolled out the fondant and covered the cake. Smooth your hands over the curves of the cake (now that was funny...) and cut off the excess fondant.
Step 5: Prepare additional details for your cake. For this cake, I created something that looked like the top of jeans with a belt out of sugarpaste.And Voila! The final cake - One Male Brown Butt. Hope you enjoyed this lighthearted tutorial on how to carve a cake.